Android中FlowLayout组件实现瀑布流效果
目录
- flowlayout实现关键步骤:
- 1、创建一个view继承自viewgroup
- 2、重写并实现onmeasure方法
- 3、重写并实现onlayout方法
- 总结
纸上得来终觉浅,绝知此事要躬行。
动手实践是学习的最好的方式,对于自定义view来说,听和看只能是过一遍流程,能掌握个30%、40%就不错了,而且很快就会遗忘,想变成自己的东西必须动手来写几遍,细细体会其中的细节和系统api的奥秘、真谛。
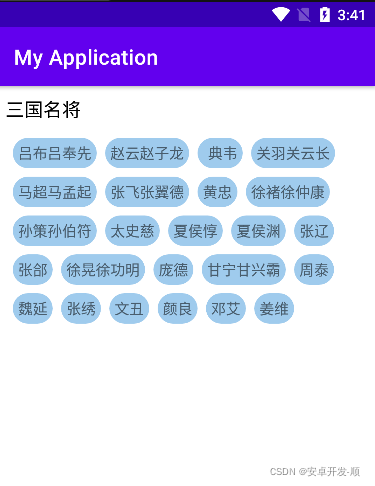
进入主题,今天来手写一个瀑布流组件flowlayout,温习下自定义view的流程和关键点,先来张效果图
flowlayout实现关键步骤:
1、创建一个view继承自viewgroup
class zsflowlayout : viewgroup {
    constructor(context: context) : super(context) {}

    /**
     * 必须的构造函数,系统会通过反射来调用此构造方法完成view的创建
     */
    constructor(context: context, attr: attributeset) : super(context, attr) {}

    constructor (context: context, attr: attributeset, defzstyle: int) : super(
        context,
        attr,
        defzstyle
    ) {
    }

}
这里注意两个参数的构造函数是必须的构造函数,系统会通过反射来调用此构造方法完成view的创建,具体调用位置在layoutinflater 的 createview方法中,如下(基于android-31):
省略了若干不相关代码,并写了重要的注释信息,请留意
 public final view createview(@nonnull context viewcontext, @nonnull string name,
            @nullable string prefix, @nullable attributeset attrs)
            throws classnotfoundexception, inflateexception {
        objects.requirenonnull(viewcontext);
        objects.requirenonnull(name);

        //从缓存中取对应的构造函数
        constructor<? extends view> constructor = sconstructormap.get(name);

        class<? extends view> clazz = null;

        try {

            if (constructor == null) {
                // 通过反射创建class对象
                clazz = class.forname(prefix != null ? (prefix + name) : name, false,
                        mcontext.getclassloader()).assubclass(view.class);

                //创建构造函数  这里的mconstructorsignature 长这个样子
                //static final class<?>[] mconstructorsignature = new class[] {
                //        context.class, attributeset.class};
                //看到了没 就是我们第二个构造方法
                constructor = clazz.getconstructor(mconstructorsignature);
                constructor.setaccessible(true);
                //缓存构造方法
                sconstructormap.put(name, constructor);
            } else {
                ...
            }


            try {
                //执行构造函数 创建出view
                final view view = constructor.newinstance(args);
                ...
                return view;
            } finally {
                mconstructorargs[0] = lastcontext;
            }
        } catch (exception e) {
            ...
        } finally {
            ...
        }
    }
对layoutinflater以及setcontentview、decorview、phonewindow相关一整套源码流程感兴趣的可以看下我这篇文章:
activity setcontentview背后的一系列源码分析
2、重写并实现onmeasure方法
override fun onmeasure(widthmeasurespec: int, heightmeasurespec: int) {

}
(1)先了解下 measurespec的含义
measurespec是view中的内部类,基本都是二进制运算。由于int是32位的,用高两位表示mode,低30位表示size。
(2)重点解释下 两个参数widthmeasurespec 和 heightmeasurespec是怎么来的
这个是父类传给我们的尺寸规则,那父类是如何按照什么规则生成的widthmeasurespec、heightmeasurespec呢?
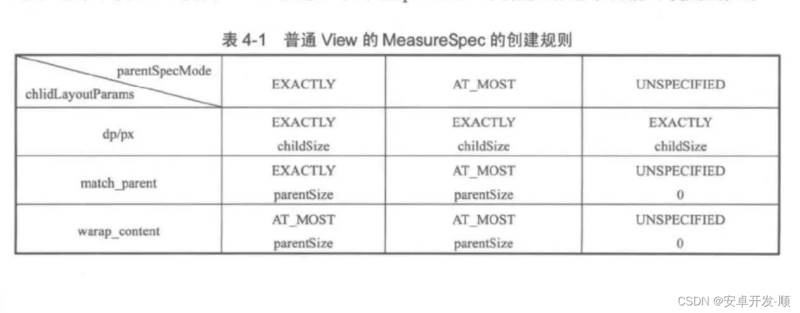
答:父类会结合自身的情况,并且结合子view的情况(子类的宽是match_parent、wrap_content、还是写死的值)来生成的。生成的具体逻辑 请见:viewgroup的getchildmeasurespec方法
相关说明都写在了注释中,请注意查看:
/**
 * 这里的spec、padding是父类的尺寸规则,childdimension是子类的尺寸
 * 举个例子,如果我们写的flowlayout被linearlayout包裹,那这里spec、padding就是linearlayout的
 * spec 可以是widthmeasurespec 也可以是 heightmeasurespec 宽和高是分开计算的,childdimension
 * 则是我们在布局文件中对flowlayout设置的对应的宽、高
 */
public static int getchildmeasurespec(int spec, int padding, int childdimension) {

        //获取父类的尺寸模式
        int specmode = measurespec.getmode(spec);
        //获取父类的尺寸大小
        int specsize = measurespec.getsize(spec);

        //去掉padding后的大小 最小不能低于0
        int size = math.max(0, specsize - padding);

        int resultsize = 0;
        int resultmode = 0;

        switch (specmode) {
        // 如果父类的模式是measurespec.exactly(精确模式,父类的值是可以确定的)
        case measurespec.exactly:
            if (childdimension >= 0) {
                //此时子view的大小就是我们设置的值,超过父类也没事,开发人员自定义设置的
                //比如父view的宽是100dp,子view宽你非要设置200dp,那就给200dp,这么做有什么
                //意义?这样是可以扩展的,不至于限制死,比如子view可能具有滚动属性或者其他高级
                //玩法
                resultsize = childdimension;
                resultmode = measurespec.exactly;
            } else if (childdimension == layoutparams.match_parent) {
                // match_parent 则子view和父view大小一致 模式是确定的
                resultsize = size;
                resultmode = measurespec.exactly;
            } else if (childdimension == layoutparams.wrap_content) {
                // wrap_content 则子view和父view大小一致 模式是最大不超过这个值
                resultsize = size;
                resultmode = measurespec.at_most;
            }
            break;

        // parent has imposed a maximum size on us
        case measurespec.at_most:
            if (childdimension >= 0) {
                // 按子view值执行,确定模式
                resultsize = childdimension;
                resultmode = measurespec.exactly;
            } else if (childdimension == layoutparams.match_parent) {
                //按父view值执行 模式是最多不超过指定值模式
                resultsize = size;
                resultmode = measurespec.at_most;
            } else if (childdimension == layoutparams.wrap_content) {
                //按父view值执行 模式是最多不超过指定值模式
                resultsize = size;
                resultmode = measurespec.at_most;
            }
            break;

        // parent asked to see how big we want to be
        case measurespec.unspecified:
            if (childdimension >= 0) {
                // 按子view值执行,确定模式
                resultsize = childdimension;
                resultmode = measurespec.exactly;
            } else if (childdimension == layoutparams.match_parent) {
                // 按父view值执行 模式是未定义
                resultsize = view.susezerounspecifiedmeasurespec ? 0 : size;
                resultmode = measurespec.unspecified;
            } else if (childdimension == layoutparams.wrap_content) {
                // 按父view值执行 模式是未定义
                resultsize = view.susezerounspecifiedmeasurespec ? 0 : size;
                resultmode = measurespec.unspecified;
            }
            break;
        }
        //noinspection resourcetype
        return measurespec.makemeasurespec(resultsize, resultmode);
    }
其实就是网上的这张图
3、重写并实现onlayout方法
我们要在这个方法里面,确定所有被添加到我们的flowlayout里面的子view的位置,这里没有特殊要注意的地方,控制好细节就可以。
三个关键步骤介绍完了,下面上实战代码:
zsflowlayout:
/**
 * 自定义瀑布流布局 系统核心方法
 * viewgroup getchildmeasurespec  获取子view的measurespec信息
 * view measure 对view进行测量 测量以后就知道view大小了 之后可以通过getmeasuredwidth、getmeasuredheight来获取其宽高
 * view measurespec.getmode 获取宽或高的模式(measurespec.exactly、measurespec.at_most、measurespec.unspecified)
 * view measurespec.getsize 获取父布局能给我们的宽、高大小
 * view setmeasureddimension 设置测量结果
 * view layout(left,top,right,bottom) 设置布局位置
 *
 * 几个验证点 getmeasuredheight、getheight何时有值 结论:分别在onmeasure 和 onlayout之后
 * 子view是relativelayout 并有子view时的情况  没问题
 * 通过addview方式添加  ok  已验证
 */
class zsflowlayout : viewgroup {

    //保存所有子view 按行保存 每行都可能有多个view 所有是一个list
    var allviews: mutablelist<mutablelist<view>> = mutablelistof()

    //每个子view之间的水平间距
    val horizontalspace: int =
        resources.getdimensionpixeloffset(r.dimen.zs_flowlayout_horizontal_space)

    //每行之间的间距
    val verticalspace: int = resources.getdimensionpixeloffset(r.dimen.zs_flowlayout_vertical_space)

    //记录每一行的行高 onlayout时会用到
    var lineheights: mutablelist<int> = mutablelistof()

    constructor(context: context) : super(context) {}

    /**
     * 必须的构造函数,系统会通过反射来调用此构造方法完成view的创建
     */
    constructor(context: context, attr: attributeset) : super(context, attr) {}

    constructor (context: context, attr: attributeset, defzstyle: int) : super(
        context,
        attr,
        defzstyle
    ) {
    }

    override fun onmeasure(widthmeasurespec: int, heightmeasurespec: int) {
        //会测量次
        allviews.clear()
        lineheights.clear()

        //保存每一行的view
        var everylineviews: mutablelist<view> = mutablelistof()
        //记录每一行当前的宽度,用来判断是否要换行
        var curlinehasusedwidth: int = paddingleft + paddingright
        //父布局能给的宽
        val selfwidth: int = measurespec.getsize(widthmeasurespec)
        //父布局能给的高
        val selfheight: int = measurespec.getsize(heightmeasurespec)
        //我们自己通过测量需要的宽(如果用户在布局里对zsflowlayout的宽设置了wrap_content 就会用到这个)
        var selfneedwidth = 0
        //我们自己通过测量需要的高(如果用户在布局里对zsflowlayout的高设置了wrap_content 就会用到这个)
        var selfneedheight = paddingbottom + paddingtop
        var curlineheight = 0

        //第一步 先测量子view 核心系统方法是 view measure方法
        //(1)因为子view有很多,所以循环遍历执行
        for (i in 0 until childcount) {
            val childview = getchildat(i)
            if (childview.visibility == gone) {
                continue
            }
            //测量view之前 先把测量需要的参数准备好 通过viewgroup getchildmeasurespec获取子view的measurespec信息
            val childwidthmeasurespec = getchildmeasurespec(
                widthmeasurespec,
                paddingleft + paddingright,
                childview.layoutparams.width
            )
            val childheightmeasurespec = getchildmeasurespec(
                heightmeasurespec,
                paddingtop + paddingbottom,
                childview.layoutparams.height
            )
            //调用子view的measure方法来对子view进行测量
            childview.measure(childwidthmeasurespec, childheightmeasurespec)

            //测量之后就能拿到子view的宽高了,保存起来用于判断是否要换行 以及需要的总高度
            val measuredheight = childview.measuredheight
            val measuredwidth = childview.measuredwidth

            //按行保存view 保存之前判断是否需要换行,如果需要就保存在下一行的list里面
            if (curlinehasusedwidth + measuredwidth > selfwidth) {
                //要换行了 先记录换行之前的数据
                lineheights.add(curlineheight)
                selfneedheight += curlineheight + verticalspace
                allviews.add(everylineviews)

                //再处理当前要换行的view相关数据
                curlineheight = measuredheight
                everylineviews = mutablelistof()
                curlinehasusedwidth = paddingleft + paddingright + measuredwidth + horizontalspace
            } else {
                //每一行的高度是这一行view中最高的那个
                curlineheight = curlineheight.coerceatleast(measuredheight)
                curlinehasusedwidth += measuredwidth + horizontalspace
            }
            everylineviews.add(childview)
            selfneedwidth = selfneedwidth.coerceatleast(curlinehasusedwidth)

            //处理最后一行
            if (i == childcount - 1) {
                curlineheight = curlineheight.coerceatleast(measuredheight)
                allviews.add(everylineviews)
                selfneedheight += curlineheight
                lineheights.add(curlineheight)
            }
        }

        //第二步 测量自己
        //根据父类传入的尺寸规则 widthmeasurespec、heightmeasurespec 获取当前自身应该遵守的布局模式
        //以widthmeasurespec为例说明下 这个是父类传入的,那父类是如何按照什么规则生成的widthmeasurespec呢?
        //父类会结合自身的情况,并且结合子view的情况(子类的宽是match_parent、wrap_content、还是写死的值)来生成
        //生成的具体逻辑 请见:viewgroup的getchildmeasurespec方法
        //(1)获取父类传过来的 我们自身应该遵守的尺寸模式
        val widthmode = measurespec.getmode(widthmeasurespec)
        val heightmode = measurespec.getmode(heightmeasurespec)
        //(2)根据模式来判断最终的宽高
        val widthresult = if (widthmode == measurespec.exactly) selfwidth else selfneedwidth
        val heightresult = if (heightmode == measurespec.exactly) selfheight else selfneedheight
        //第三步 设置自身的测量结果
        setmeasureddimension(widthresult, heightresult)
    }

    override fun onlayout(changed: boolean, l: int, t: int, r: int, b: int) {
        //设置所有view的位置
        var curt = paddingtop
        for (i in allviews.indices) {
            val mutablelist = allviews[i]
            //记录每一行view的当前距离父布局左侧的位置 初始值就是父布局的paddingleft
            var curl = paddingleft
            if (i != 0) {
                curt += lineheights[i - 1] + verticalspace
            }
            for (j in mutablelist.indices) {
                val view = mutablelist[j]
                val right = curl + view.measuredwidth
                val bottom = curt + view.measuredheight
                view.layout(curl, curt, right, bottom)
                //为下一个view做准备
                curl += view.measuredwidth + horizontalspace
            }
        }
    }
}
在布局文件中使用:
<?xml version="1.0" encoding="utf-8"?>
<scrollview xmlns:android="http://schemas.android.com/apk/res/android"
    android:layout_width="match_parent"
    android:layout_height="match_parent">

    <linearlayout
        android:layout_width="match_parent"
        android:layout_height="match_parent"
        android:orientation="vertical">

        <textview
            android:layout_margintop="10dp"
            android:layout_width="wrap_content"
            android:layout_height="wrap_content"
            android:layout_marginleft="@dimen/zs_flowlayout_title_marginl"
            android:text="三国名将"
            android:textcolor="@android:color/black"
            android:textsize="18sp" />

        <com.zs.test.customview.zsflowlayout
            android:id="@+id/activity_flow_flowlayout"
            android:layout_width="match_parent"
            android:layout_height="wrap_content"
            android:layout_margin="8dp"
            android:padding="7dp">

            <textview
                android:layout_width="wrap_content"
                android:layout_height="wrap_content"
                android:background="@drawable/shape_button_circular"
                android:text="吕布吕奉先" />

            <textview
                android:layout_width="wrap_content"
                android:layout_height="wrap_content"
                android:background="@drawable/shape_button_circular"
                android:text="赵云赵子龙" />

            <textview
                android:layout_width="wrap_content"
                android:layout_height="wrap_content"
                android:background="@drawable/shape_button_circular"
                android:paddingleft="10dp"
                android:text="典韦" />

            <textview
                android:layout_width="wrap_content"
                android:layout_height="wrap_content"
                android:background="@drawable/shape_button_circular"
                android:text="关羽关云长" />

            <textview
                android:layout_width="wrap_content"
                android:layout_height="wrap_content"
                android:background="@drawable/shape_button_circular"
                android:text="马超马孟起" />

            <textview
                android:layout_width="wrap_content"
                android:layout_height="wrap_content"
                android:background="@drawable/shape_button_circular"
                android:text="张飞张翼德" />

            <textview
                android:layout_width="wrap_content"
                android:layout_height="wrap_content"
                android:background="@drawable/shape_button_circular"
                android:text="黄忠" />

            <textview
                android:layout_width="wrap_content"
                android:layout_height="wrap_content"
                android:background="@drawable/shape_button_circular"
                android:text="徐褚徐仲康" />

            <textview
                android:layout_width="wrap_content"
                android:layout_height="wrap_content"
                android:background="@drawable/shape_button_circular"
                android:text="孙策孙伯符" />

            <textview
                android:layout_width="wrap_content"
                android:layout_height="wrap_content"
                android:background="@drawable/shape_button_circular"
                android:text="太史慈" />

            <textview
                android:layout_width="wrap_content"
                android:layout_height="wrap_content"
                android:background="@drawable/shape_button_circular"
                android:text="夏侯惇" />

            <textview
                android:layout_width="wrap_content"
                android:layout_height="wrap_content"
                android:background="@drawable/shape_button_circular"
                android:text="夏侯渊" />

            <textview
                android:layout_width="wrap_content"
                android:layout_height="wrap_content"
                android:background="@drawable/shape_button_circular"
                android:text="张辽" />

            <textview
                android:layout_width="wrap_content"
                android:layout_height="wrap_content"
                android:background="@drawable/shape_button_circular"
                android:text="张郃" />

            <textview
                android:layout_width="wrap_content"
                android:layout_height="wrap_content"
                android:background="@drawable/shape_button_circular"
                android:text="徐晃徐功明" />

            <textview
                android:layout_width="wrap_content"
                android:layout_height="wrap_content"
                android:background="@drawable/shape_button_circular"
                android:text="庞德" />

            <textview
                android:layout_width="wrap_content"
                android:layout_height="wrap_content"
                android:background="@drawable/shape_button_circular"
                android:text="甘宁甘兴霸" />

            <textview
                android:layout_width="wrap_content"
                android:layout_height="wrap_content"
                android:background="@drawable/shape_button_circular"
                android:text="周泰" />

            <textview
                android:layout_width="wrap_content"
                android:layout_height="wrap_content"
                android:background="@drawable/shape_button_circular"
                android:text="魏延" />

            <textview
                android:layout_width="wrap_content"
                android:layout_height="wrap_content"
                android:background="@drawable/shape_button_circular"
                android:text="张绣" />

            <textview
                android:layout_width="wrap_content"
                android:layout_height="wrap_content"
                android:background="@drawable/shape_button_circular"
                android:text="文丑" />

            <textview
                android:layout_width="wrap_content"
                android:layout_height="wrap_content"
                android:background="@drawable/shape_button_circular"
                android:text="颜良" />

            <textview
                android:layout_width="wrap_content"
                android:layout_height="wrap_content"
                android:background="@drawable/shape_button_circular"
                android:text="邓艾" />

            <textview
                android:layout_width="wrap_content"
                android:layout_height="wrap_content"
                android:background="@drawable/shape_button_circular"
                android:text="姜维" />

        </com.zs.test.customview.zsflowlayout>

    </linearlayout>

</scrollview>
也可以在代码中动态添加view(更接近实战,实战中数据多是后台请求而来)
class flowactivity : appcompatactivity() {

    @bindview(id = r.id.activity_flow_flowlayout)
    var flowlayout : zsflowlayout ? = null;
    override fun oncreate(savedinstancestate: bundle?) {
        super.oncreate(savedinstancestate)
        setcontentview(r.layout.activity_customview_flow)
        bindviewinject.inject(this)

        for (i in 1 until 50) {
            val tv:textview = textview(this)
            tv.text = "textview $i"
            flowlayout!!.addview(tv)
        }
    }
}
其中bindviewinject是用反射+注解实现的一个小工具类
object bindviewinject {


    /**
     * 注入
     *
     * @param activity
     */
    @jvmstatic
    fun inject(activity: activity) {
        inject(activity, false)
    }

    fun inject(activity: activity, issetonclicklistener: boolean) {
        //第一步 获取class对象
        val aclass: class<out activity> = activity.javaclass
        //第二步 获取类本身定义的所有成员变量
        val declaredfields = aclass.declaredfields
        //第三步 遍历找出有注解的属性
        for (i in declaredfields.indices) {
            val field = declaredfields[i]
            //判断是否用bindview进行注解
            if (field.isannotationpresent(bindview::class.java)) {
                //得到注解对象
                val bindview = field.getannotation(bindview::class.java)
                //得到注解对象上的id值 这个就是view的id
                val id = bindview.id
                if (id <= 0) {
                    toast.maketext(activity, "请设置正确的id", toast.length_long).show()
                    return
                }
                //建立映射关系,找出view
                val view = activity.findviewbyid<view>(id)
                //修改权限
                field.isaccessible = true
                //第四步 给属性赋值
                try {
                    field[activity] = view
                } catch (e: illegalaccessexception) {
                    e.printstacktrace()
                }
                //第五步 设置点击监听
                if (issetonclicklistener) {
                    //这里用反射实现 增加练习
                    //第一步 获取这个属性的值
                    val button = field.get(activity)
                    //第二步 获取其class对象
                    val javaclass = button.javaclass
                    //第三步 获取其 setonclicklistener 方法
                    val method =
                        javaclass.getmethod("setonclicklistener", view.onclicklistener::class.java)
                    //第四步 执行此方法
                    method.invoke(button, activity)
                }
            }
        }
    }
}
@target(annotationtarget.field)
@retention(retentionpolicy.runtime)
annotation class bindview( //value是默认的,如果只有一个参数,并且名称是value,外面传递时可以直接写值,否则就要通过键值对来传值(例如:value = 1)
// int value() default 0;
val id: int = 0
)总结
到此这篇关于android中flowlayout组件实现瀑布流效果的文章就介绍到这了,更多相关android flowlayout瀑布流内容请搜索萬仟网以前的文章或继续浏览下面的相关文章希望大家以后多多支持萬仟网!
看完文章,还可以用支付宝扫描下面的二维码领取一个支付宝红包,目前可领1-88元不等

除了扫码可以领取之外,大家还可以(复制 720087999 打开✔支付宝✔去搜索, h`o`n.g.包哪里来,动动手指就能领)。
看下图所示是好多参与这次活动领取红包的朋友:
